11 October 2016
However much fun it is to install piping for a new station, getting it done on time - in order to get home for the weekend - is even better. Here are some tips and tricks that will make the installation work more efficient and possibly even impress managers and customers.
1. Weld 2 Sockets at a Time
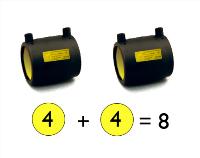
This is called welding in series, and if you have not heard of the concept before it may sound too good to be true. It is actually possible - and allowed - to connect two sockets in series to the KPS welding machine and weld them both in one go!
First, look at the circled number on the yellow labels on the sockets. As long as the sum of the numbers is 10 or lower, these sockets can be welded in series.
Next, locate the jumper cable that came with the welding machine. Once you have made all the usual preparations, connect the standard welding cables and connect one to each socket. Then connect the two sockets with the jumper cable. Now you are good to go.

The jumper cable is not very long so it only works on sockets located near each other, but there should be several of those in any normal installation. Here are a few combinations to look out for:


2. Have many Clamps & Work on Parallel Lines
Since each welded socket should be clamped and fixated for at least 30 minutes after welding, the best chance of an efficient work flow is to have lots of clamps and work on parallel lines. Quite often there are 4 or more pipes running to each dispenser. It makes sense to work on these in parallel so that 4 joints that will sit beside or near each other are prepared at the same time and welded just after each other.

All the preparations that go into starting a task, such as scraping and cleaning the pipe, need to be done only once for all 4 joints. There is no need to go fetch tools and supplies in between and no need to move the welding machine and power supply cables from one spot to another.
In a suction system there will be fewer pipes running in parallel but the principle still applies. Plan the installation so that the team will not have to move tools and equipment around too much.
3. Pre-assemble off site
It does not require much more than some installation experience and proper installation drawings to identify which parts of the piping and containment system that can be prepared and pre-assembled in a workshop, then be shipped off to site for installation.
Working inside in a workshop gives a controlled environment with proper lighting, easy access to work benches and no wind, rain, snow or harsh sunlight. This makes it easier to work efficiently and with good quality control.
Some items that are suitable for pre-assembly are:
Tee assemblies and bends - especially those that will go in tight one-piece dispenser sumps
These are perfect for pre-assembly, regardless if they will go in dispenser sumps or not. But for those who has to deal with cheaper polyethylene sumps this can save a lot of time and irritation. PE sumps by nature comes in one piece and although the size of the opening can vary, it is usually small and designed to fit within the dispenser cabinet footprint. Reaching in and fitting multiple parts together for multiple lines is not easy. Sometimes you see these tee pre-assemblies being made on site too, but it is even better if they can be prepared in the workshop.

Complete dispenser sumps including entry seals
This is just taking it one step further. With access to reliable information of the site and an installation drawing that includes levels and reference points, it entirely possible to prefabricate the entire dispenser sumps with entry seals and tees or elbows ready up until and including shear valves (in pressure systems) in the workshop. It is just important to keep track of on which height the pipe should enter each sump in order to get enough slope down to the tanks.
To sum it up: Weld more things at the same time, create a good workflow where you do not have to move things around too much and get some stuff done before you even go on site.