26 October 2016
So you got out of the office to go and have a look at the construction site where a new station is being built. Maybe you work for the retailer, maybe you are the owner or manager of the installation company or maybe you work for the project management company hired to make sure everything is done correctly and in due time.
But how are you supposed to know if the team on site is doing a good job or not? If you have been around for a while you probably have a mental or even written down checklist for your site visits, but chances are piping did not make it to the top of that list - if it even made the list.
Our technical support team has dealt with numerous cases where something went wrong. More often than not it has to do with installation errors caused by lack of training and proper understanding of requirements. An installation made without proper care is quite easy to spot once you know the things to look for.
Here is the top 3 telltale signs of a careless piping installation, according to our support engineers and trainers:
1. No marks for insert depths - or marks made after the fact
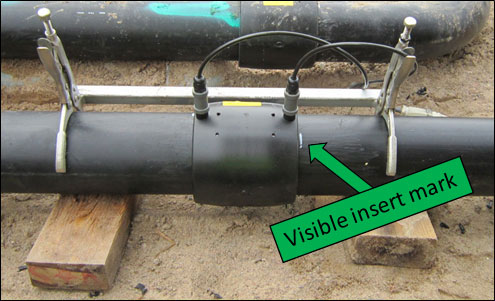
Plastic filling station piping is joined with electrofusion welding, which means that two pipe ends are inserted into each side of a socket and the plastic of the pipes and the inside of the socket is melted, plastic mixes and once everything cools off it will be fused together. To ensure that the pipes are inserted fully into the socket, the insert depth need to be measured and marked on the pipe. Usually drawn with a white permanent marker, the marks should align with the side of the welding socket.

If you spot welded sockets where the pipe is lacking the marking for insert depth, chances are good someone cheated. The pipe may then sit anywhere in the socket. It may have an insert depth of only a centimeter. Unless the pipe is fully inserted in the socket there is always a risk of leakage or in worst case the joint will come apart entirely during pressure testing, refill or due to the ground settling later on.


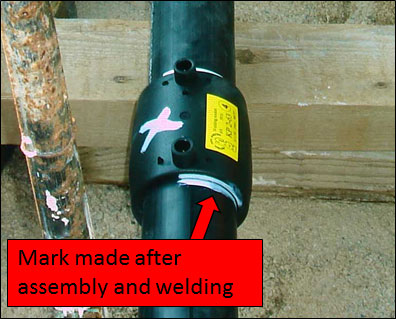
Sometimes an installer will cheat with insert marks during installation and draw them on just before a site inspection or before photos are taken. In this case, you will see paint from the marker on both the pipe and the edge of the socket.

If you spot this, check to see if you can see any original markings below. Sometimes installers want to clarify that they did mark insert depths and exaggerate them by drawing an extra line on top. You should then be able to see a less perfect line below. If not, it is time to talk to the team leader on site and demand an explanation.
2. No X's or times noted on welding socket
Installers usually work in pairs or teams and prepare several parallel pipe runs simultaneously. It is easy to loose track of what has been welded and what has not. That is why every trained installer will mark the socket with an X once the welding cycle is complete. This ensures that all sockets are in fact welded.

The conscientious installer will also note the current time on the socket upon completion of the welding cycle in order to know when welding clamps can be removed. During welding the plastic inside the socket heat up to about +200ºC and melts into a liquid state. Pipes need to sit square and fixated in the welding socket until the plastic cools down. If the pipe does not sit straight in the socket or moves out of position, melted plastic will escape from the welding area and the weld may not be tight. Usually installers have a bunch of clamping tools so they can work efficiently on parallel pipe runs without wasting precious time.

Marking with an X and the time also prevents accidental repeat welding that may cause over-welding where the plastic start boiling.
If installers are not noting the time of welding onto socket, ask how they can be sure enough cooling time has been allowed. If X's are missing also this is a serious deviation from good installation practice which needs to be rectified immediately.
3. No sign of scraping
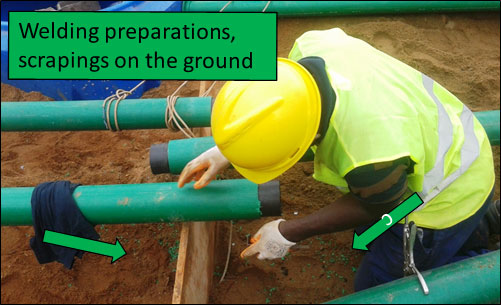
For electrofusion welding to work properly, the plastic surfaces of the pipe need to be virgin and clean. During storage and transport a thin film of oxide forms of the pipe surface. This needs to be removed before welding and the way to do this is by scraping either with a handheld scraper or a specialized tool attached to a drilling machine. Simple handheld scrapers are by far the most common. A minimum of 0.1 mm of the surface needs to be scraped off over the whole surface to be welded.
You should see black and/or green scrapings in trenches near welding sockets and the pipe surface should show clear signs of meticulous scraping.

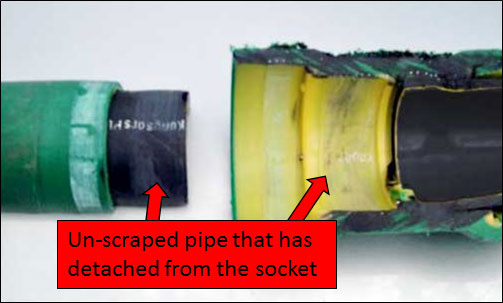
If you cannot see clearly on the pipe surface near a welding socket that the pipes have been scraped for welding, then someone has cheated.

Welds with unscraped pipe may not be tight and could even lack proper attachment altogether. Make sure the situation is addressed before it becomes an issue. It is much easier to fix it now than to excavate and identify a leak later. It is also less embarrassing to deal with an untrained installer than to explain a failed pressure test to a customer.